Overview
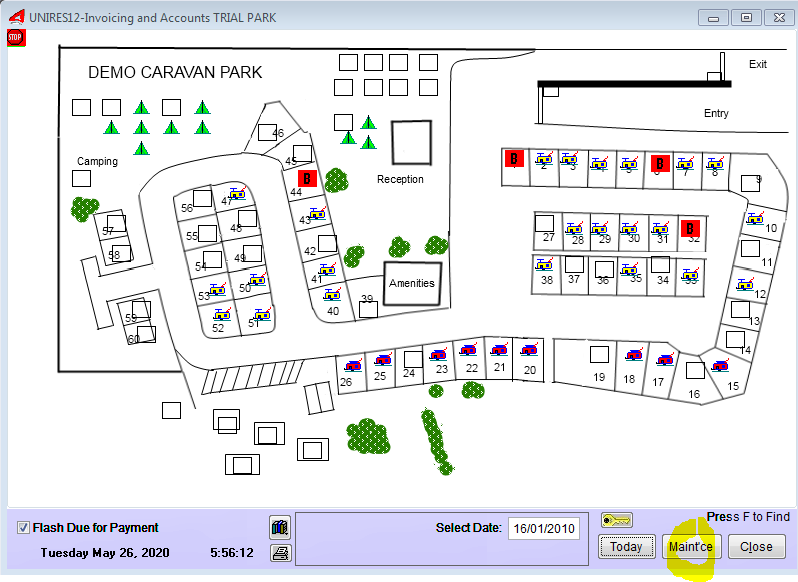
The Map system is basically a picture graphic file displayed as a background image, overlaid with site marker smart icons showing occupancy status. The picture shown for an icon or type of site can be chosen when a site type is created. See File Maintenance - Site Types.
When you float the mouse pointer over a map icon..
•If the site is vacant, the site type and number is shown.
•If the site is occupied or booked, the Site, Customer Name and Booking Dates are shown.

Map Indicators
Vacant Sites are empty squared (red outline).
Booked Sites are shown as a red Picture Icon representing the type of site (Cabin, Tent, Caravan etc) You can define your own 32x32 pixel icons or bmp's, save them in UniRes 12\mapgraphics folder and set the picture in the Site Types Maintenance file under Site Maintenance menu.
Occupied sites are shown with other icons like tents, caravans, cabins or any picture file that is linked to the site type.
Click on the Maintenance button once to set the map in maintenance mode. You can the Drag & Drop the icons around the screen to theit respective positions. The site number is displayes at the cursor arrow.
Initially all the map icons appear one on top of another like a pack of cards, in the top left of the map picture. (X0, Y0)
Call support if you want help with setting up a map and markers.
For additional information, see also ..
Set up the Map
Map Picture File Location
Display the Occupancy of your Park
The map date always shows today's date as the default date and shows who is in your park and their location.
Book a site directly from the map
Vacant Sites are shown as a red transparent square. To book a site from todays date, double-click on a Red Outlined square. This is a Vacant Site indicator (may vary if customized).
The Booking program will be launched. Make the booking - enter charges. You will be returned back to the Map when finished. Note that the Booking Ledger or the Bookings Button is more commonly used to book sites as they are more flexible with the booking date pre-selection.
Charging from the Map
You can bring the site details of an occupant forward to the charges window by clicking on an occupied site icon. The Selected Site Details are shown in a pop-up window. From this window, click on the Billing button. The Charges screen will open and you can now enter charges to the account.
Showing Occupancy for a Specific Date
To show occupancy for a specific date, place the mouse cursor in the select date box and type in the required date. Sites occupying the site (booked) will be shown. You can also right click on the Select date box to bring up a selection calendar to help pick a date.
Positioning Site Markers
After you have set the Map Picture Background, you can drag & drop the site markers into their proper place on the map. Initially all site markers are at coordinates 0,0 (top left of the map). This is discussed further in Setup your Map topic.
Created with the Personal Edition of HelpNDoc: Free EPub and documentation generator