Email configurations
Brings 4 ways for you to send emails:
(All this is quite technical. Call UniRes support for assistance, or if you understand geek talk, read on..)
Note: If you have errors when sending a report (Statement etc) as an attachment, use the cdo-html option in foxypeviewer email settings.
1 – MAPI - Uses the WinAPI MapiSendMail to try to send the current report as an attachment.
This setting sends a standard message, with one or more attached files and a cover note. The cover note is a dialog box that allows the user to enter a list of recipients and an optional message and other sending options. It will open a dialog email sending message, waiting for a user interaction. The message will not be sent automatically. It’s up to the user to veryfy the information ofthe message and to click at the “Send” button.
This function tries to establish a session using the messaging system's shared session. If no shared session exists, it will fail sending the message.
This works pretty well if you have your default account set using MS Outlook Express, MS Outlook or Windows Live Mail. Definitely, it’s the easiest way to send your messages, because this way, FoxyPreviewer will use the default Email configuration of the computer.
2 - MAPI Alternative – Uses the WinAPI MapiSendDocuments to try to send the current report as an attachment.
The MAPISendDocuments function sends a standard message with one or more attached files and a cover note. The cover note is a dialog box that allows the user to enter a list of recipients and an optional message and other sending options.
This function tries to establish a session using the messaging system's shared session. If no shared session exists, it will fail sending the message.
This works pretty well if you have your default account set using MS Outlook Express, MS Outlook or Windows Live Mail. Definitely, it’s the easiest way to send your messages, because this way, FoxyPreviewer will use the default Email configuration of the computer.
Although MS says that “The use of this function is discouraged. It may be altered or unavailable in subsequent versions of Windows.”, it’s been working well in all OS’s, from WinNT to Win 10
3 – Custom Email Procedure
Contact Support for a quotation to customise your email requirements.
4 – CDO
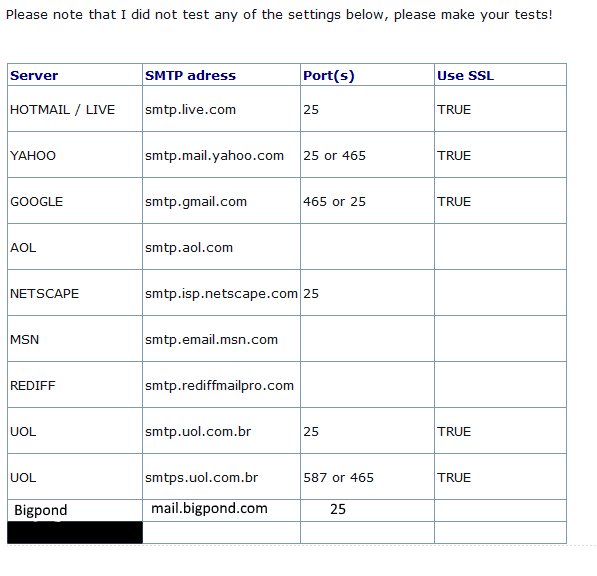
Uses the CDO2000 component included in windows 2000 and later. It allows you to send emails using a SMTP server. All settings must be accurate in order to make this work. For example, below is the configuration for a “Hotmail” or “Live” account to send emails.
Email Server Settings Reference
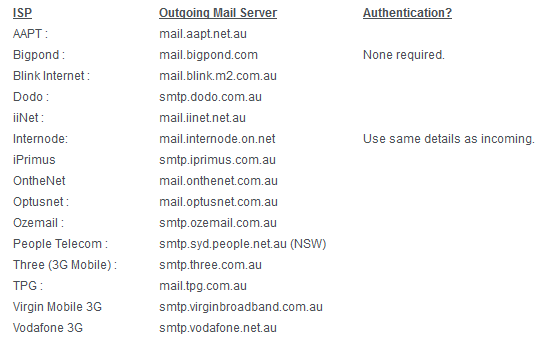
ISP Providers Reference


Note: If gmail sending wont work, go to https://accounts.google.com/DisplayUnlockCaptcha and try again.
erificationSigning in with 2-Step Verification
Sign in with App Passwords
Sign in with App Passwords
Tip: App Passwords aren’t recommended and are unnecessary in most cases. To help keep your account secure, use "Sign in with Google" to connect apps to your Google Account.
An App Password is a 16-digit passcode that gives a less secure app or device permission to access your Google Account. App Passwords can only be used with accounts that have 2-Step Verification turned on.
When to use App Passwords
Tip: iPhones and iPads with iOS 11 or up don’t require App Passwords. Instead use “Sign in with Google.”
If the app doesn’t offer “Sign in with Google,” you can either:
Use App Passwords
Switch to a more secure app or device
Create & use App Passwords
If you use 2-Step-Verification and get a "password incorrect" error when you sign in, you can try to use an App Password.
Go to your Google Account.
Select Security.
Under "Signing in to Google," select App Passwords. You may need to sign in. If you don’t have this option, it might be because:
2-Step Verification is not set up for your account.
2-Step Verification is only set up for security keys.
Your account is through work, school, or other organization.
You turned on Advanced Protection.
At the bottom, choose Select app and choose the app you using and then Select device and choose the device you’re using and then Generate.
Follow the instructions to enter the App Password. The App Password is the 16-character code in the yellow bar on your device.
Tap Done.
Tip: Most of the time, you’ll only have to enter an App Password once per app or device, so don’t worry about memorizing it.
Why you may need an App Password
App Passwords revoked after password change
Forgot your App Password
You still can’t sign in
Fix problems with Microsoft Outlook
Created with the Personal Edition of HelpNDoc: Single source CHM, PDF, DOC and HTML Help creation