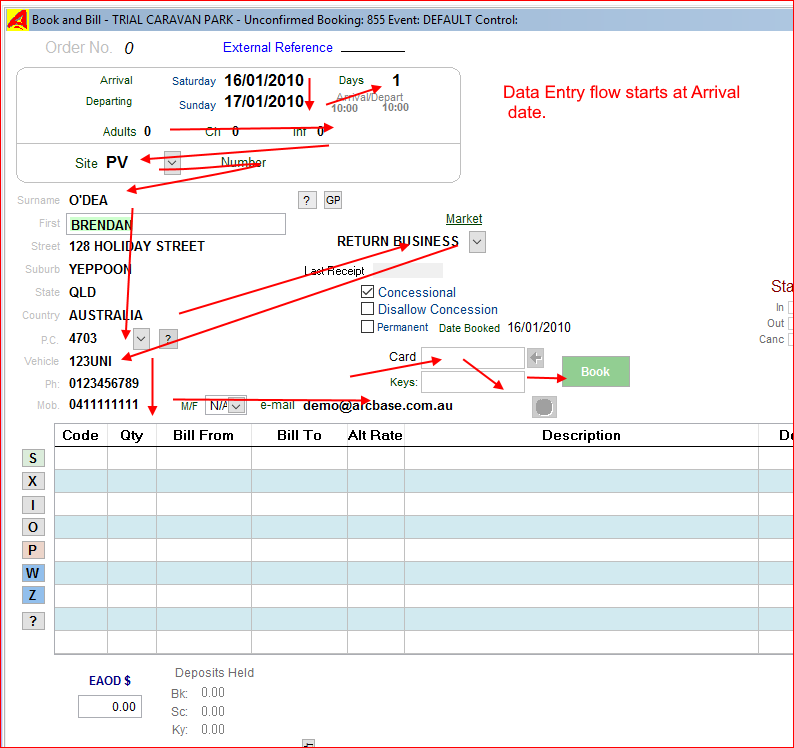
New booking details are entered starting at the arrival date.
Use the <Enter> key to complete the fields or skip through
fields not required.
The System Settings options has a tick box that when set, lower case can be entered in the name and address fields. UniRes will capitalize the first letters of most wortds typed
except "and" etc. Also special Caps like O'Connell etc will be corrected. If Capitalization is not wanted, the tick can be removed and then the keyboard only is used (Caps Lock etc).
If Caps Lock is on, no auto capc is done by UniRes, so individual fields can still be capitalized by the operator.
(The Browse Bookings facility {Command Centre - Administration) has utility options available to globally rescan all bookings as Auto Capitalise or all Caps name and address fields.)
External Reference____________
This optional field must be selected with the mouse. Enter any alpha-numeric data (Max 15 Characters).
This is a searchable field in the Booking Search option screen.
eg. Use to reference booking numbers from external source.
Press the Enter Key to move from field to field. Use the Mouse sparingly or to move back.
Arrival Time/Departure Times
The From Time has been preset to 10:00 am but you can change this if you wish.
Note that UniRes books sites to-the-minute and a site will not be available for another booking until the site is released by checking-out the site booking.
Arrival and separture times are derived from Either Global settings, or if supplied by the Site Type record (Site Type Maintenance) the defaults are set in the booking. ie. Cabins may be available from 2pm (14:00 hrs) to 10.oo am on departure day (vacate before time, while other site may be from 10am to 10am on the departure date.
Entering Arrival and Departure Dates
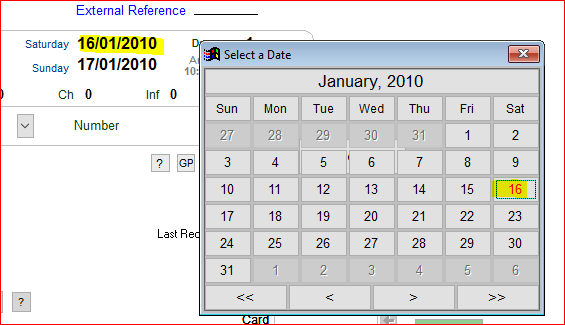
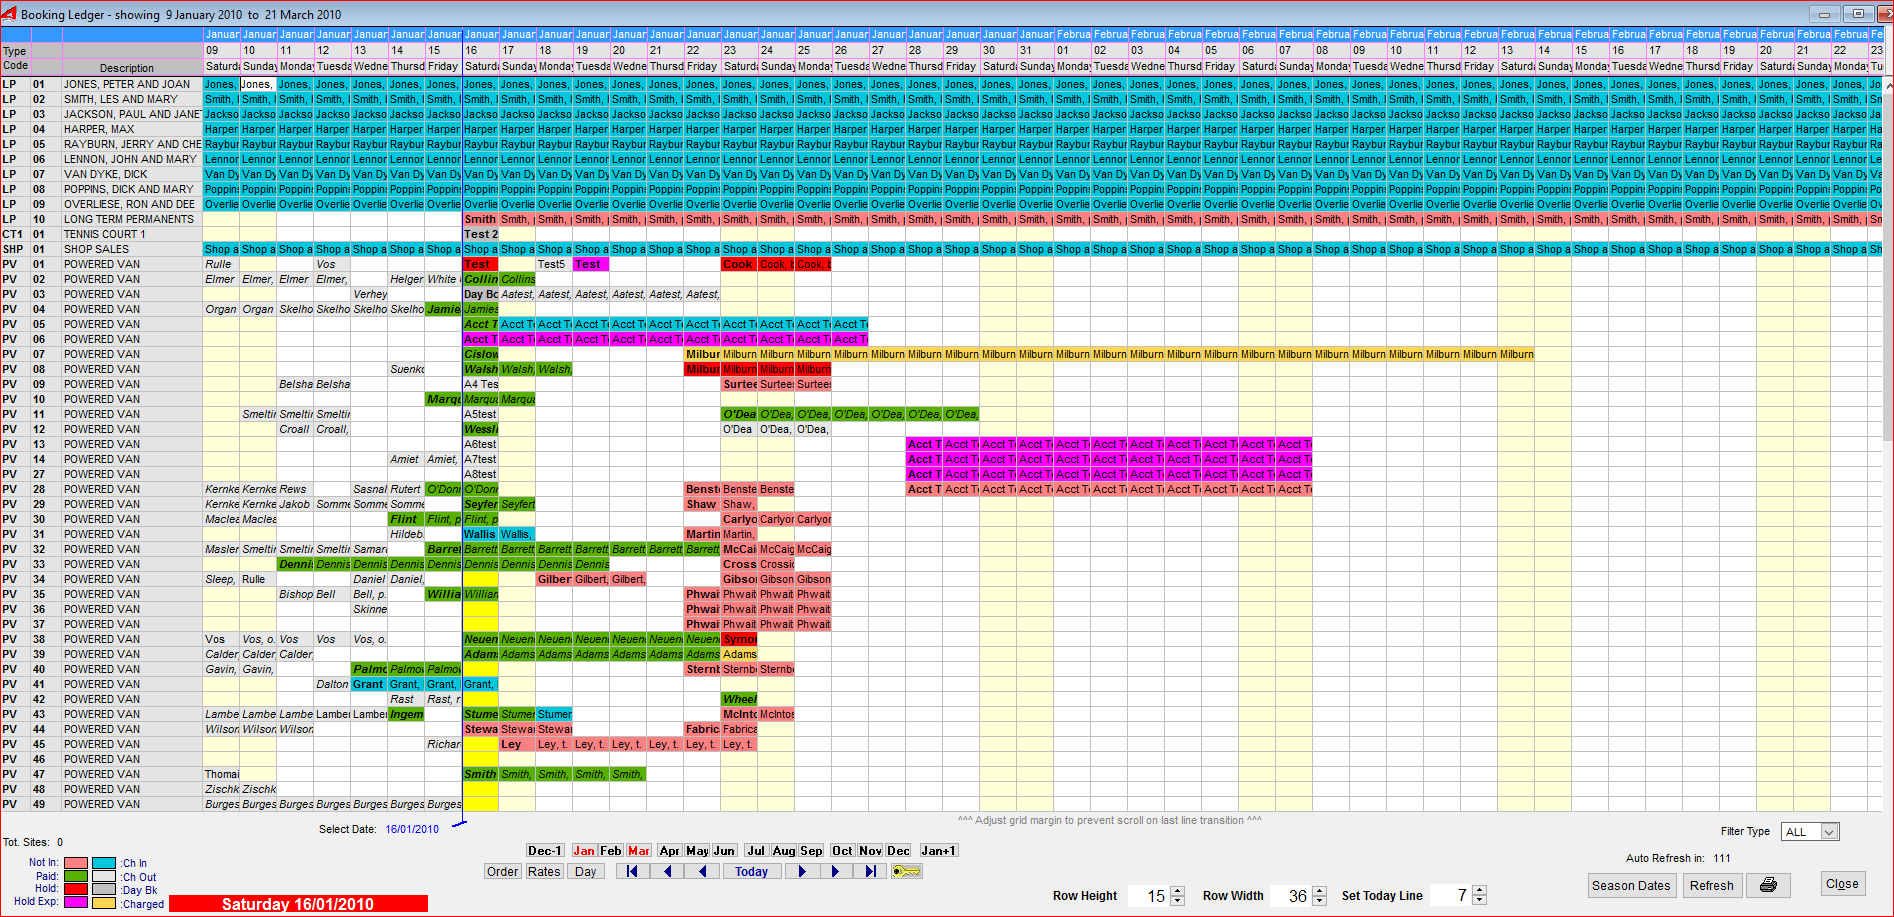
Right click on a Date field to select by claendar or just enter a date. If you selected a site from the Booking Ledger, the Arrival date is entered for you and the departure date is the arrival date plus 1 day.
Entering the number of days will set the Departure date for you also, conversely the number of days (Night stays) is calculated for you also.
All date fields in UniRes have the right click calendar popup.
Arrival Date (Compulsory)
The From Date field will contain today's date, but if the booking is for a future date, enter the future date. See also Date Fields for an alternative way to pick a date.
Note that UniRes books sites to-the-minute and a site will not be available for another booking until the site is released by checking-out or cancelling the site booking.
Days
After entering the From Date, enter the number of Days for the booking. The To-Date will be calculated for you. You can also leave the days field as is and enter a From-Date later. The days will be calculated then from the supplied To-Date.
Departing Date
This is the departure date. The To Date field contains the From date + 1 when a new booking is made. You can change this if you wish. This is the departure date.
Days
Helps to work out the To-Date (date of departure). Enter the length of the booking in days.
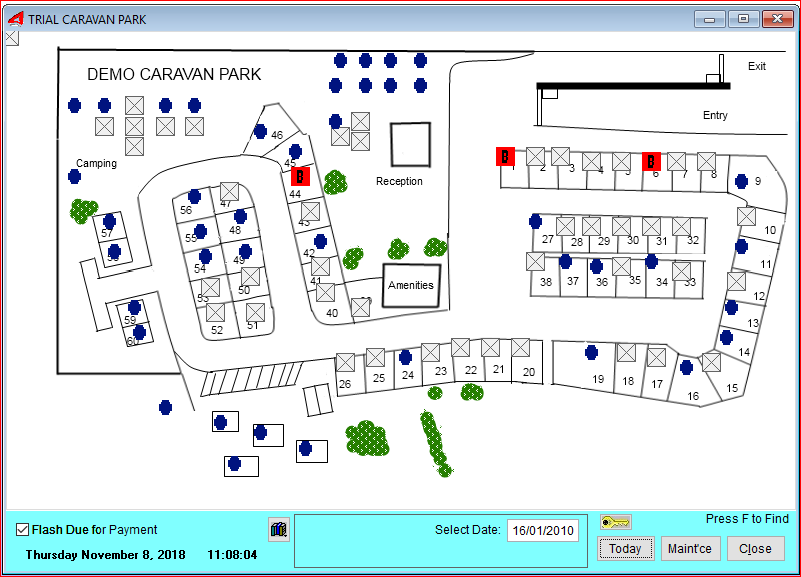
(If you picked the site from the Booking Ledger or the Map, the Type and Number are carried forward to the booking screen. So just enter through the fields.)
Site (Compulsory)
With the cursor in the Site field, press enter and use your up and down arrow keys to highlight the required site type and press enter.
Site Number (Compulsory)
Directly enter a number now of an available site if you know it to be vacant, or you can leave the field blank and press Enter to pick a site from the availability list.
If you left the Site number field empty the Available Positions List is displayed. See How to use the Available Positions List.
Use the Page Up, Page Down keys and/or your up and down arrow keys to move the highlight bar to the site you want to book.
Surname (Compulsory)
Enter the Surname of the customer, click the ? button, or press the F9 key to search the history or current booking file for someone who has been in the park before and use the old details. For a Business, Enter the Business Name.
The details of the past booking is pasted into the booking, saving time. The latest booking is always shown at the top of the Name Search list.
( Part of a surname can also be entered to find matching. Both Current and History bookings are seaarched.
Just press the Enter Key through the pre filled in fields or enter new details.

or 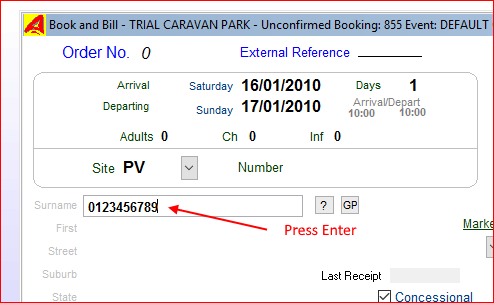 11.4.xx screen example
Phone Number Search
(Searches both Phone and Mobile fields of existing bookings)
When making a new booking and the cursor is in the SURNAME field...
You can enter an 8 or 10 digit phone number (std code or no area code) to find a past booking and if found, the details can be pasted into the new booking.
This works differently to the already existing F9 search facility (search past bookings on surname).
The Booking surname field recognizes that you have typed in a number, and if the number does not start with a zero, a search will automatically begin after the eighth number is typed.
If the number starts with a zero, the search will begin automatically after the tenth digit is entered.
Do not enter spaces etc. between digits.
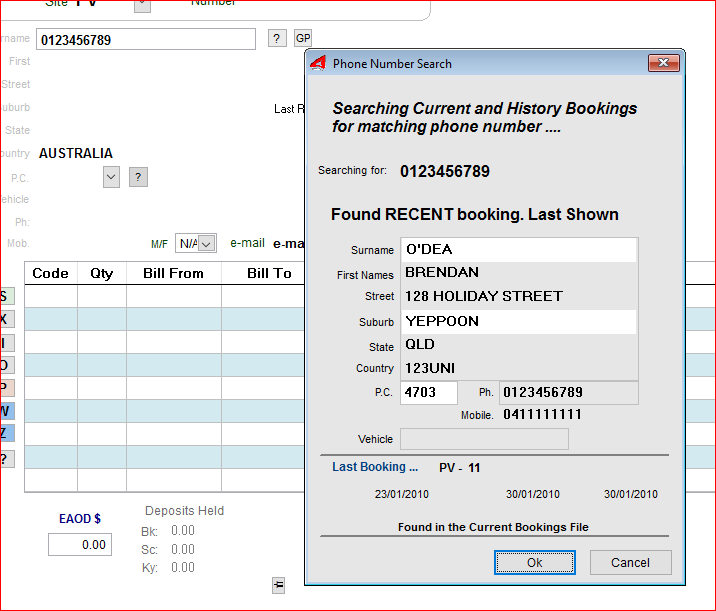
The Booking Phone field is scanned for matching numbers and the program will be smart enough to remove any spaces you have recorded in phone number fields. Note that if you have recorded other characters like / etc. in a phone number, the serach will most likely fail and an F9 search should be initiated eg. 07/55962956 would fail.
The Search program will search both the current and history booking files. The latest booking with a matching phone number is returned.
When the History file is searched (no match in current), the search results screen will also show how many past bookings matching the phone number exist.
Always confirm the retrieved details before pasting into the new booking. You can always change the retrieved details if they have changed.
Preset Market Code
IN BOTH THE F9 SEARCH AND THE PHONE NUMBER SEARCH, THE MARKET CODE IS PRESET TO "RETURN BUSINESS (6)". IF YOUR MARKET CODE SCHEME HAS CHANGED. YOU WILL HAVE TO SET MARKET CODE 6 TO RETURN BUSINESS WHICH IS THE DEFAULT CODE IN UNIRES.
Note: The System Settings has options that can be set to force entry of address data (option) is required.
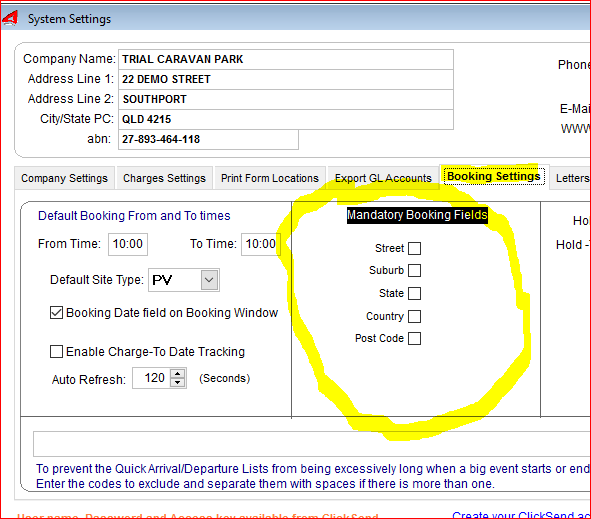 See: Command Centre - System Settings button - Booking Settings TAB ...
First Names
Enter the First names of the customer. For a business, enter the Full Name and Surname of the contact person so that the Mail Merge, Letters & Envelope printing looks right.
Street address
Enter the street address, or if there is a building name, just enter it here and enter the street address in the next line.
Suburb
Manually enter the suburb name or use the Post Code Finder facility to enter both the suburb and post code from the finder.
If you are not given the Post Code, you can click on the ? box next to the Suburb field to bring up the Post Code Finder window.
State
Enter the State eg. QLD, NSW etc.
Country
This is a special input box. Just press enter twice if Australian residents, or start typing the name of the country where the persons are from. The Country Name can be analysed by the UniRes Sales Analysis program.
Post Code
Manually enter the Postal Code or use the Post Code Finder facility to enter both the suburb and post code from the finder.
Phone
Just enter a contact phone number. Note that the Extended Booking Details window can record more details about a client.
Mobile
Just enter a contact phone number. Note that the Extended Booking Details window can record more details about a client.
Vehicle
Enter Vehicle registration/s in the Vehicle field
Qty
Enter the number of vehicles on site. This field can be enabled/disabled in the System Access program.
Adults
Enter the number of Adults staying on site. The number of adults you enter here are used in the charges program.
Children
Enter the number of children staying on site. The number of children + the number of adults are the number of persons (in total) staying on the site.
Infants
Enter the number of Infants (usually below 12 mts old). This field is optional and may not be visible. Infants are not part of the charging system for Site Fees. If you charge for Infants, the Extra Persons warning message does not check for infants- See File Maintenance - System Access - Charges System
Pets
Enter the number of Pets (usually Dogs). This field is optional and may not be visible - See File Maintenance - System Access - Charges System
Discount
This field may read NMRA or some other discount code as defined in the System Access Program (File Maintenance).
Select Yes or No. This field works in conjunction with the Extended Booking Details, where individual discounts can be set. The discounts only apply to site fees.
Market
With the cursor in the Market box, press enter and use your keyboard up and down arrow keys to pick a preset market code and press enter. You can set your own Market Codes and the definition using Market Code Maintenance.
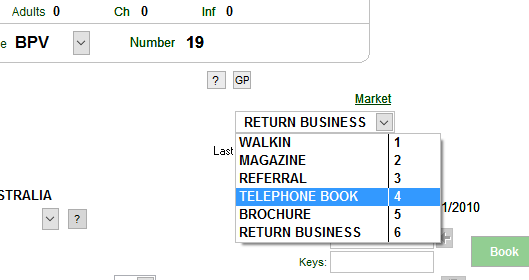
Paid To Date
No entry possible here.
This date is maintained by UniRes when a site fee is charged. For new bookings, the paid to date is the same as the booking from date.
BK Date: The date the booking was made. Defaults to to-days date. Field can be enabled/disabled in the System Access screen. If a booking was made earlier on and you are entering bookings the next day or later, you can change this date to reflect the actual date of the booking request.
Tick Boxes
Booking Status - (Not visible when a new booking is being entered.)
In
Out
Canc.
Concessional
Disallow Concession
No Move
These tick boxes are skipped when you make a new booking. You can set these after a booking is made. If you need to set them, use the mouse and then use the mouse to position back to the last field you entered. Most of the tick boxes are automatically set for you during the course of booking..eg. Check-In is set when a site fee is charged, Checked-Out is set when you press F3 or click on the check-out button etc. The No Move tick box is always manually ticked.
After Booking ..
Note: You can also use the Booking Ledger to set the Checked-In, Check-Out and Cancell Status by right-clicking on the booking line in the Booking Ledger and select the required choice from the pop-up menu.
In (Tick Box)
When a new booking is made, the In status is not ticked (it's just a booking). You can set the In status by left-clicking on the In box. This is then a Manual Check-In.
The In Status is also set automatically when a Site Fee is charged (The S Key Code in Charges).
Out (Tick Box)
The out tick box contains a tick if the booking has checked out. Usually the In status is also ticked as the tenant is usually checked-in and then checked-out. Sometimes the booking can have a checked-out status without a checked in status. The operator has in this case never charged a site fee or manually set the checked-in status. If a booking is Cancelled, the Checked-Out Status and the Cancelled Status are both ticked. Reversing a Check-Out is done by removing the tick from the checked-out box (click again on it). If a booking is checked back in by resetting the Checked-out status, the booking is again validated to prevent a double booking (someone may have rebooked the site in the meantime).
Checked-Out and Cancelled Bookings show up in the booking ledger as a feint grey booking.
Canc (Tick Box)
The Canc tick box contains a tick if the booking has Cancelled. The Out status is also ticked automatically when cancelling. Reversing a Cancelled booking is done by removing the tick from the checked-out box first (booking validation) and then remove the tick from the Canc. box . If a booking is checked back in by resetting the Checked-out status, the booking is again validated to prevent a double booking (someone may have rebooked the site in the meantime).
Checked-Out and Cancelled Bookings show up in the booking ledger as a feint grey booking.
No Move
This tick box is skipped or not visible when you make a new booking. You can set the booking No Move in charges if need be. When you place a tick in the No Move box, the Move-a-Booking facility will disallow the site to be moved to a different site. The Booking Dates can still be changed.
Concessional
No Concession
These two options are only available after the booking is made and while in the Charges screen for the booking. They are used to control the Tax collected when a site fee and other charges are calculated. See the Charges System .
Electronic Keys
If you have the optional Boom Gate Module installed, an additional input field and number picker button is displayed before the normal door key field.
Key Numbers
Just press enter at this stage. (Keys can be recorded if you wish but are normally recorded in the charges program.)
Separate multiple key numbers with a space.
Credit Card Details Recording (if turned on in System Settings)
At the end of the booking input cycle, when you step past the Keys field, a Credit Card details entry window will pop-up if the option is set in File Maintenance - System Settings - Access Control..
If you don't want to record credit card details at the time of booking, just press the Enter Key through the credit card input fields.
You can, after the booking is made, enter or change the credit card details for the booking in the Extended Booking Details for the booking.
Credit Card Details are encrypted in the data files for security and the full card number is not retained after check-out or cancellation of the booking. Credit Card number format is verified for correct number structure. You can also set the type of cards you accept in the System Settings.
Created with the Personal Edition of HelpNDoc: Easily create Help documents