We now tell UniRes the type of site groups you have, and allocate a three-character code to the site types.
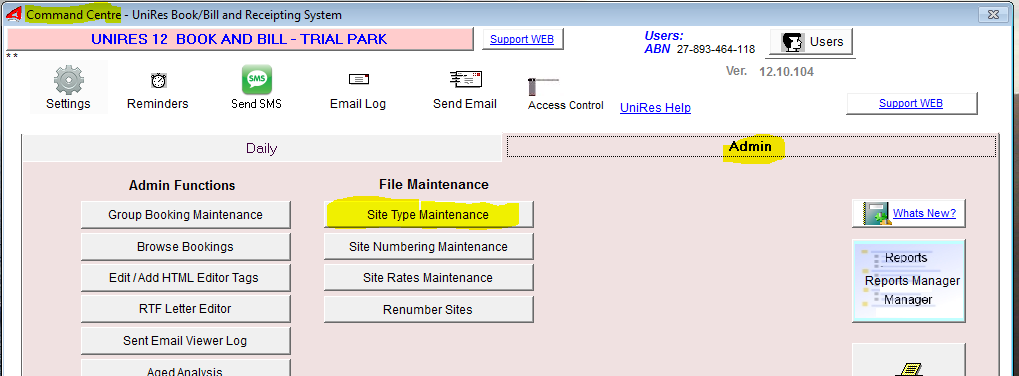
Position yourself back to the Command Centre.
or
Select File Maintenance from the Menu Bar at the top of the Command Centre
Then select Site Types.
eg. Individual sites (or items you hire out) are referenced by a three character Site Type Code and a 4 character Site Number code.
ie. PV 01...PV 02... PV 03...
Note that the UniRes system will right justify (place spaces to the left of the number), to separate the type from the number for uniformity when listing sites. So PV1 is stores and displayed as PV 1.
When adding site numbers to a Site Type, keep the number sequence uniform, by padding the number with a "0" (zero)... eg. 01... 02...03 might read ...
PV 01
PV 02
PV 03
You can use Alpha characters in a site number part of a site reference eg.... PV 12A ... PV 12B etc.
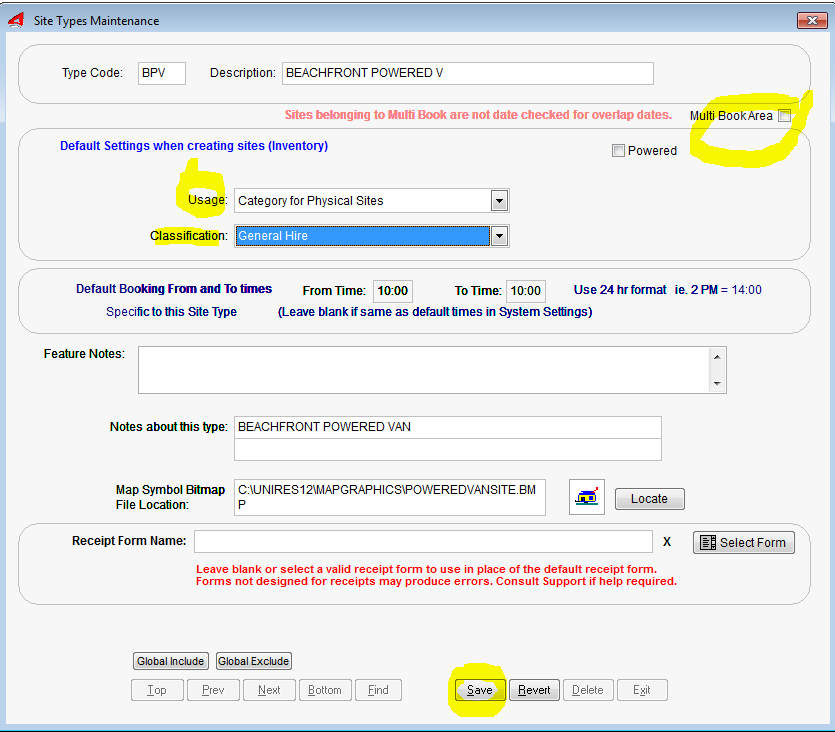
Multi Book Area
or Waiting List
For sites and stock items that are reserved, but not exclusively hired or reserved, (not checked for double booking like a designated site), you can place a tick in the Multi-Book box to indicate that the Site Type Group can be booked by several and not exclusively reserved.
You only need to create one site for the site Type to be able to book that site multiple times.
We suggest you create a site number "000" (zero, zero, zero) for the group.
Give the site type a meaningful Type code and description ... eg.
OVF Overflow site bookings
or
WAI Waiting for Vacant
Type Number
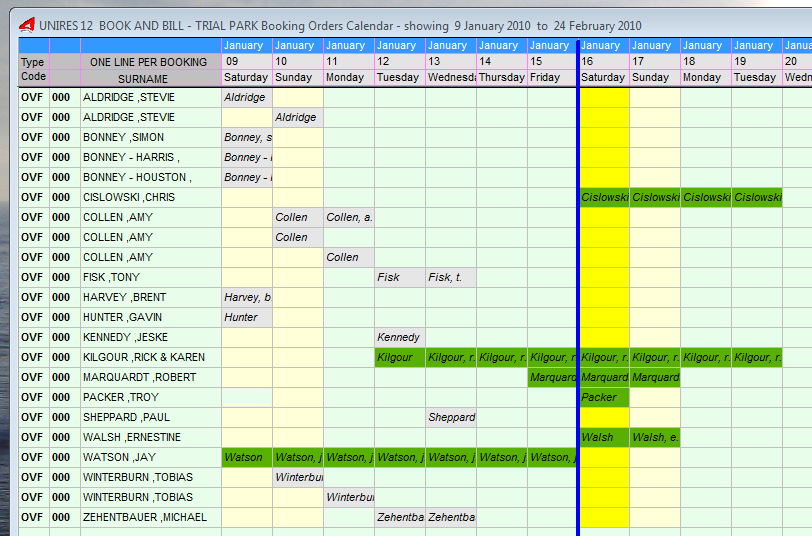
OVF 000
WAI 000
You can then book as many sites as you want to a multibook area without validation.
The area can be a physical area like a grassy field, or a Virtual Area (for Waiting List)
eg. Order Calendar displays bookings but Surname vertically . Note all are for site (area) 000.


Add/Edit Delete Buttons
Add/Edit or Delete Site Type records.
Add a new Site Type record for every site type group you have in your park.
Edit the currently displayed Site Type record, the click on Save to save your changes.
Delete: You can only delete a site type if no site numbers have been allocated to the site type group and no bookings exist using the site type.
Note.
The Add button will change to a Save button when you are adding a new site type.
The Edit button will change to a Revert button when you are adding a new site type, so you can cancel the add mode.
Why have site types and numbers?
To simplify charging for hire .. You can have an area of marked out sites (or similar hire items) with the same rate set by the SITE TYPE PREFIX.
eg. All PV sites (Powered Van Sites) are $50.00 per day $300.00 per week
All PT sites (Powered Tent Sites) are $10.00 per day $60.00 per week
Input Fields ...
Type
This is the Site type Group code. A Maximum of three characters can be entered here. This Code represents a Group of Similar physical sites in your park.
Eg. PV for Powered Van, TS for Tent Sites LTP for Long Term Permanents, BUS for open camping area (Bus Tours maybe).
Note that the Rates file uses the TYPE code prefix to determine the site fees. See Site Rates.
Usage
You can pick from 4 different usage indicators.
•Category for Physical Sites: If the Site Type is going to have site numbers allocated for normal rental select this type.
The default setting is Category for Physcal Sites.
•Alternate Rate - No Physical Sites: Select this usage indicator if the site type exists only for use as a special Charge rate and no numbers are allocated to the type. The Type code will the not appear in various lists.
Holiday Letting Agent use only.
Managed Sales Income: If you are using UniRes as a Holiday Letting Agent system, allocate this usage type and add site numbers for the properties you manage.
Managed Sales Deductions: If you are using UniRes as a Holiday Letting Agent system, allocate this usage type and add site numbers for EXPENSE BOOKINGS. Then make one expense booking for the owner of the property as set in Control Accounts.
Classification
Pick a classification from the drop down list which best describes the use of the Site Type. The Classification is used by the Sales Analysis program. When you make a booking, the class code is copied to the booking. If the booking is not the same class as the default class for the site type, you can use the Extended Booking Details of the booking to set a different classification code.
Description
The description of the Site Type. Eg. POWERED VAN
Notes about this type
This is an small note area for your use. It can serve as a reminder. It is only used in this screen and is optional.
Map Symbol Bitmap
The UniRes Map will display an occupied site as a small Icon. The Site Types Maintenance program is used to set the Map Icons used to display occupancy.
Picture files suitable for the map are located in the .\mapgraphics folder directly under the UniRes12 folder.
These small pictures are about 18x18 pixels.
Select a picture using the Locate button.
Set the View to Thumbnails to see what the pictures look like.
Select one with the mouse click and click on ok.
Select a suitable icon file to represent your site types on the map.
Note: If you are familiar with the paint program, you can design your own Icons and save them as a .bmp file. The dimensions of the Icon picture can be up to 23w x 20h pixels.
Navigating the File
Use these four buttons to move through the Site Type file.
Find Button
Click on this button to find a site type already on file.
Double click on a site type line to go to the record.
Print Button
Click on the Print Button to print a list of site types.
The following Options are available.
Customise: To change the report form layout.
Preview: To preview what the printed report looks like.
Print: Send the report-list to the printer.
Close: Return to the Site Types Maintenance window.
Global Include & Global Exclude
These two special buttons can be used to make the site type visible/invisible to the UniRes Map (your park map).
How to use the Global Include/Exclude buttons
If you are setting up a special site type for an event with hundreds or thousands of sites and you don't want the sites to display on the map, use the Next button to navigate to the site type to exclude and when the record is on the screen, click on the Global Exclude button. To reverse a Global Exclude for all sites of the displayed type, click on the Global Include button.
How it works ...
The Site Numbering file has 1 record for each site identified by a site type and number combination. The Site number record has a special field called Exclude from Map (a tick box). When you click on Global Exclude, all the site numbers for the site type will be "ticked" as Exclude from Map. See Site Numbering .
If you are setting up your park for the first time ...
After setting up your site types, you can now either set up you site charging rates table or add site numbers to the site types.
You will need to complete both before you can start booking.
Created with the Personal Edition of HelpNDoc: Free PDF documentation generator